Designing
In this designing guide, we explain the characteristics of the shapes in Frame0 and how to edit and combine them to create wireframes.
Adding shapes
Section titled “Adding shapes”You can create a wireframe by adding specially designed UI shapes and icons from the library or by adding primitive shapes.
Adding primitive shapes
Section titled “Adding primitive shapes”To add a primitive shape:
- Select a shape tool (Rectangle, Ellipse, Text, Image, Connector, Line, Freehand, or Highlighter) from the Toolbar
- Click and drag on the canvas.
For detailed information about each primitive shape, please refer to Primitive shapes.
Adding from libraries
Section titled “Adding from libraries”To add a shape from the libraries:
- Find the shape you want to add in the Shapes View (you can select a category or search using keywords).
- Click on the shape you want to add, or drag and drop it onto the canvas.
Adding icons
Section titled “Adding icons”To add an icon,
- Find the icon you want to add in the Icons View (you can search using keywords).
- Click on the icon you want to add, or drag and drop it onto the canvas.
Adding shapes by keyboard
Section titled “Adding shapes by keyboard”To add a shape (or an icon) by keyboard,
- Open the Insert Shape Dialog by pressing
Cmd/CtrlIor selecting View > Insert shapes… from the Main Menu. - Search shapes (or icons) by keyword
- Navigate to a shape to add by
Arrow keysand pressEnter.
Editing shapes
Section titled “Editing shapes”This section introduces various methods for editing shapes.
Selecting shapes
Section titled “Selecting shapes”To select shapes, press ESC or select Select from the Toolbar, then click to select a specific shape or drag an area to select multiple shapes.
Moving shapes
Section titled “Moving shapes”You can move the selected shapes by dragging them with the mouse. To move shapes horizontally or vertically, mouse click and drag while pressing Shift key. If you move first horizontally the shape will only move horizontally and vice versa.
You can also move selected shapes using the keyboard.
- Pressing the arrow keys (
↑,↓,←,→) moves them by 1px, - Pressing the arrow keys with shift key (
Shift↑,Shift↓,Shift←,Shift→) moves them by the grid size.
Sizing shape
Section titled “Sizing shape”You can adjust the size of the selected shape through the handles located on its top, bottom, left, right, or corners.
If you want to resize while maintaining the aspect ratio, hold down the Shift key while sizing with the handles. (For Image shapes, the aspect ratio is maintained by default, so hold down the Shift key if you don’t want to maintain the aspect ratio.)
Rotating shape
Section titled “Rotating shape”You can rotate the shape using the circular handle that appears at the top-left corner of the shape.
If you rotate a shape while holding Shift, it snaps in 15-degree increments.
If you want to disable the rotation of the shape, click the Rotation Lock toggle button in the Common tool section of the Inspector Sidebar.
Deleting shapes
Section titled “Deleting shapes”To delete the selected shapes, simply press Delete key.
You can also delete shapes using eraser tool:
- Select Eraser tool in the Toolbar.
- While clicking and dragging on the canvas, pass over the shapes you want to erase.
Duplicating shapes
Section titled “Duplicating shapes”To duplicate the selected shape, press Cmd/Ctrl D.
Or, mouse click on the shape to duplicate and drag while pressing Opt/Alt key.
Primitive shapes
Section titled “Primitive shapes”In Frame0, wireframes are designed based on composing 11 types of primitive shapes:
If you want to add a specific primitive shape continuously, lock the shape tool in the Toolbar. To unlock it, select the Select tool or press ESC.
If you want to continuously add a specific primitive shape, click the shape tool again in the Toolbar or click the Lock button that appears on the far left of the Toolbar to enable lock. To unlock, click the Lock button again, select the Select tool, or press ESC.
Rectangle
Section titled “Rectangle”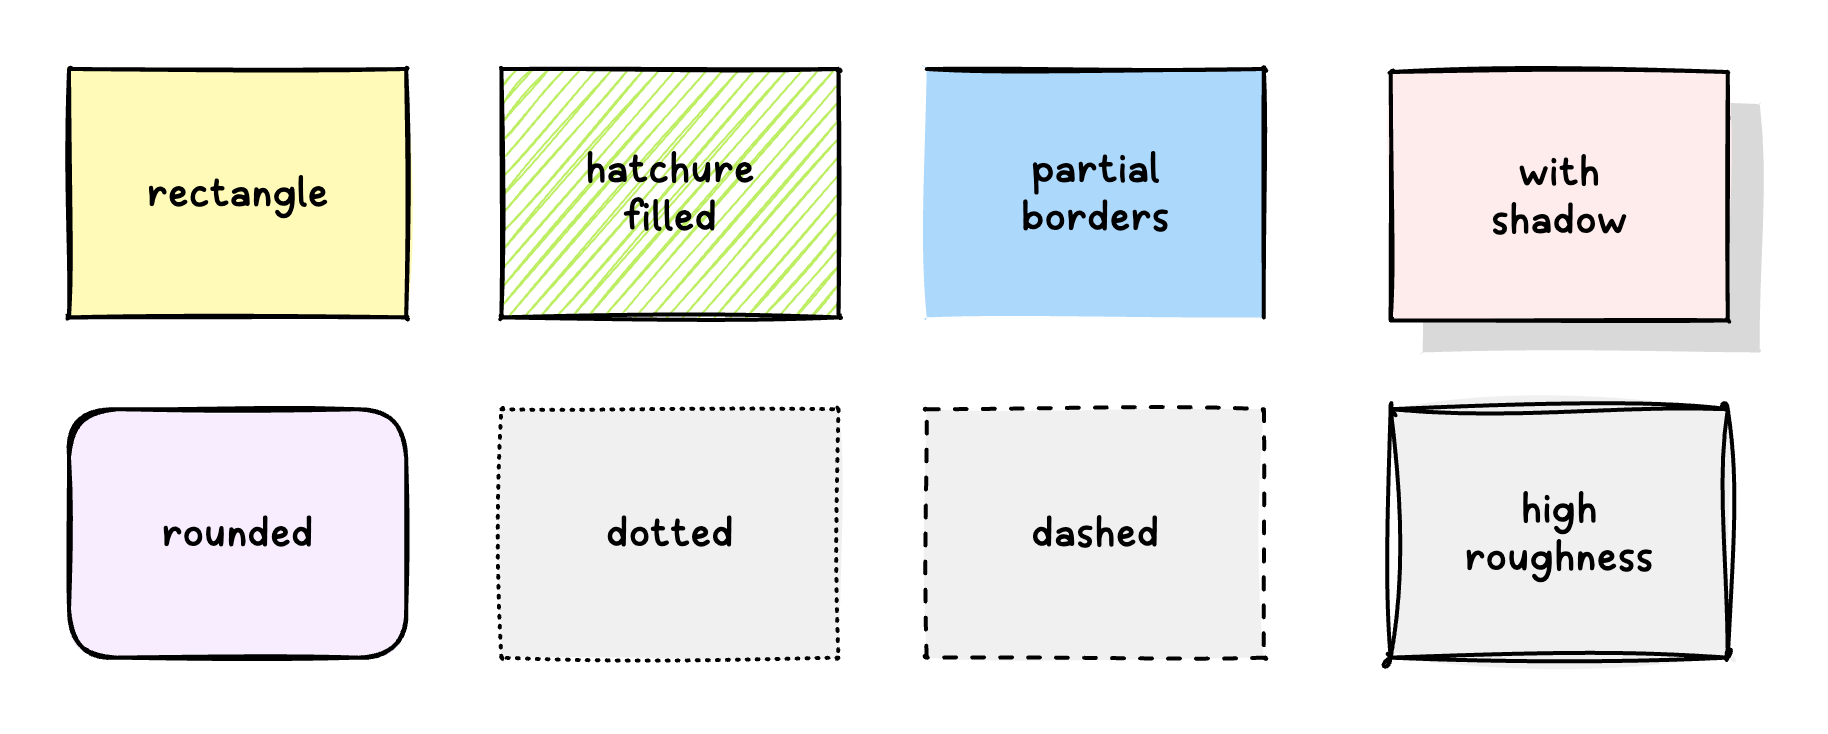
A Rectangle represents a rectangular shape.
To add a rectangle, press R or select Rectangle from the Toolbar, then click and drag on the canvas to the desired size.
Ellipse (Oval)
Section titled “Ellipse (Oval)”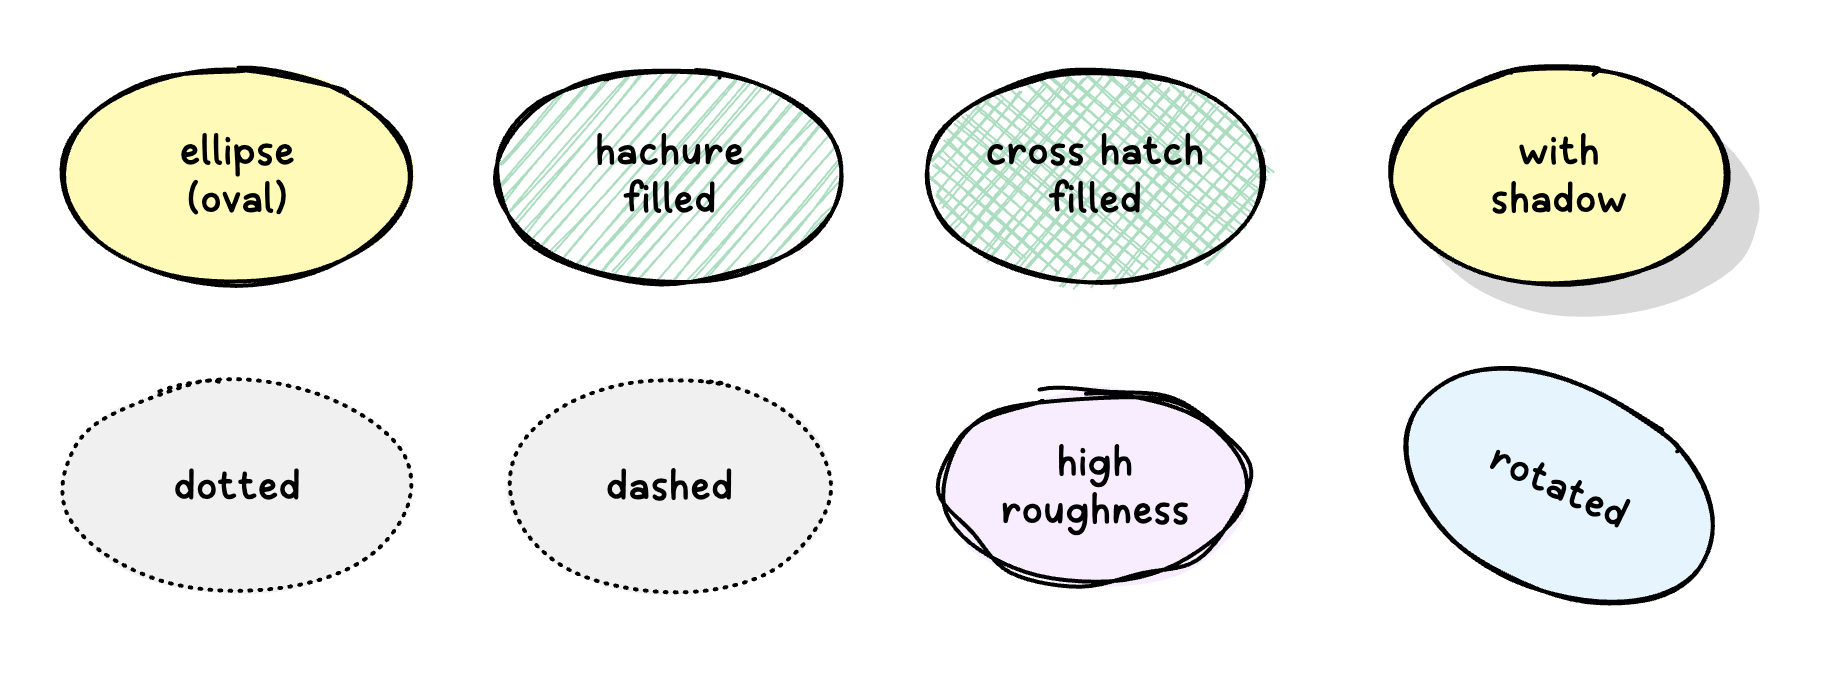
A Ellipse represents a elliptical shape.
To add an ellipse, press O or select Ellipse (Oval) from the Toolbar, then click and drag on the canvas to the desired size.

A Text is a shape that represents text. It supports rich text, allowing decorations, styles, and colors to be applied to the text.
To add a text, press T or select Text from the Toolbar, then click on the canvas where you want to place.
Or, you can add a text quickly by double clicking on blank area of the canvas.
To edit the text, double click the text shape or press Enter if the text is selected.
You can attach a text shape to a Line shape so that it moves together with the line shape. To create an attached text, double-click on any point of the line shape. The attached point can be moved later with the mouse.

An Image represents a bitmap (PNG, JPEG) or a vector shape (SVG).
To add an image, press I or select Image from the Toolbar, then select an image file in the open dialog.
Or, you can add an image by drag an image file and drop on the canvas.

A Line is a shape that connects two or more points. When the starting point and endpoint are connected, it forms a closed polygon.
To add a line, press L or select Line from the Toolbar, then click and drag on the canvas.
Or, if you want add a polyline (or polygon), click on multiple points on the canvas and press ESC to finish adding points. If you finish adding points by clicking on the first point, the points will form a closed polygon.
If you drag while holding Shift, the angle of the segment snaps in 15-degree increments.
A Line shape has one of two route types: straight or curve. This can be set in the Line tool of the Inspector Sidebar.
The two endpoints of a Line shape can have various arrowheads. This can be set in the Line tool of the Inspector Sidebar or the Floating Toolbar.
Connector
Section titled “Connector”
A Connector is a specialized line shape used to link two shapes. Its endpoints can be attached to specific shapes, and the connection remains intact even if the linked shapes are moved.
To add a connector, press C or select Connector from the Toolbar, then click and drag on the first shape to a second shape to connect. You can also add a connector with no connections by click and drag on blink area on the canvas.
The endpoints of the connector are connected by being located inside a specific shape. The endpoints can be freely moved via drag-and-drop and can also be connected to other shapes.
The endpoints are connected to the outline of the shape, and if you want to add connection margins, you can adjust it in the Line tool of the Inspector Sidebar.
A Connector is a type of Line, so its route type and arrowheads can be configured.
Freehand
Section titled “Freehand”
A Freehand is a shape that allows you to freely draw curves using a pointing device.
To add a freehand curve line, press F or select Freehand from the Toolbar, then click and drag on the canvas. A freehand curve is generated following the trajectory of your mouse movement.
Freehand’s thinning and the tapering of its start and end can be adjusted in the Line tool of the Inspector Sidebar.
Highlighter
Section titled “Highlighter”
A Highlighter is similar to Freehand but is primarily used to emphasize specific parts.
To add a highlighter curve line, press G or select Highlighter from the Toolbar, then click and drag on the canvas. A highlighter curve is generated following the trajectory of your mouse movement.
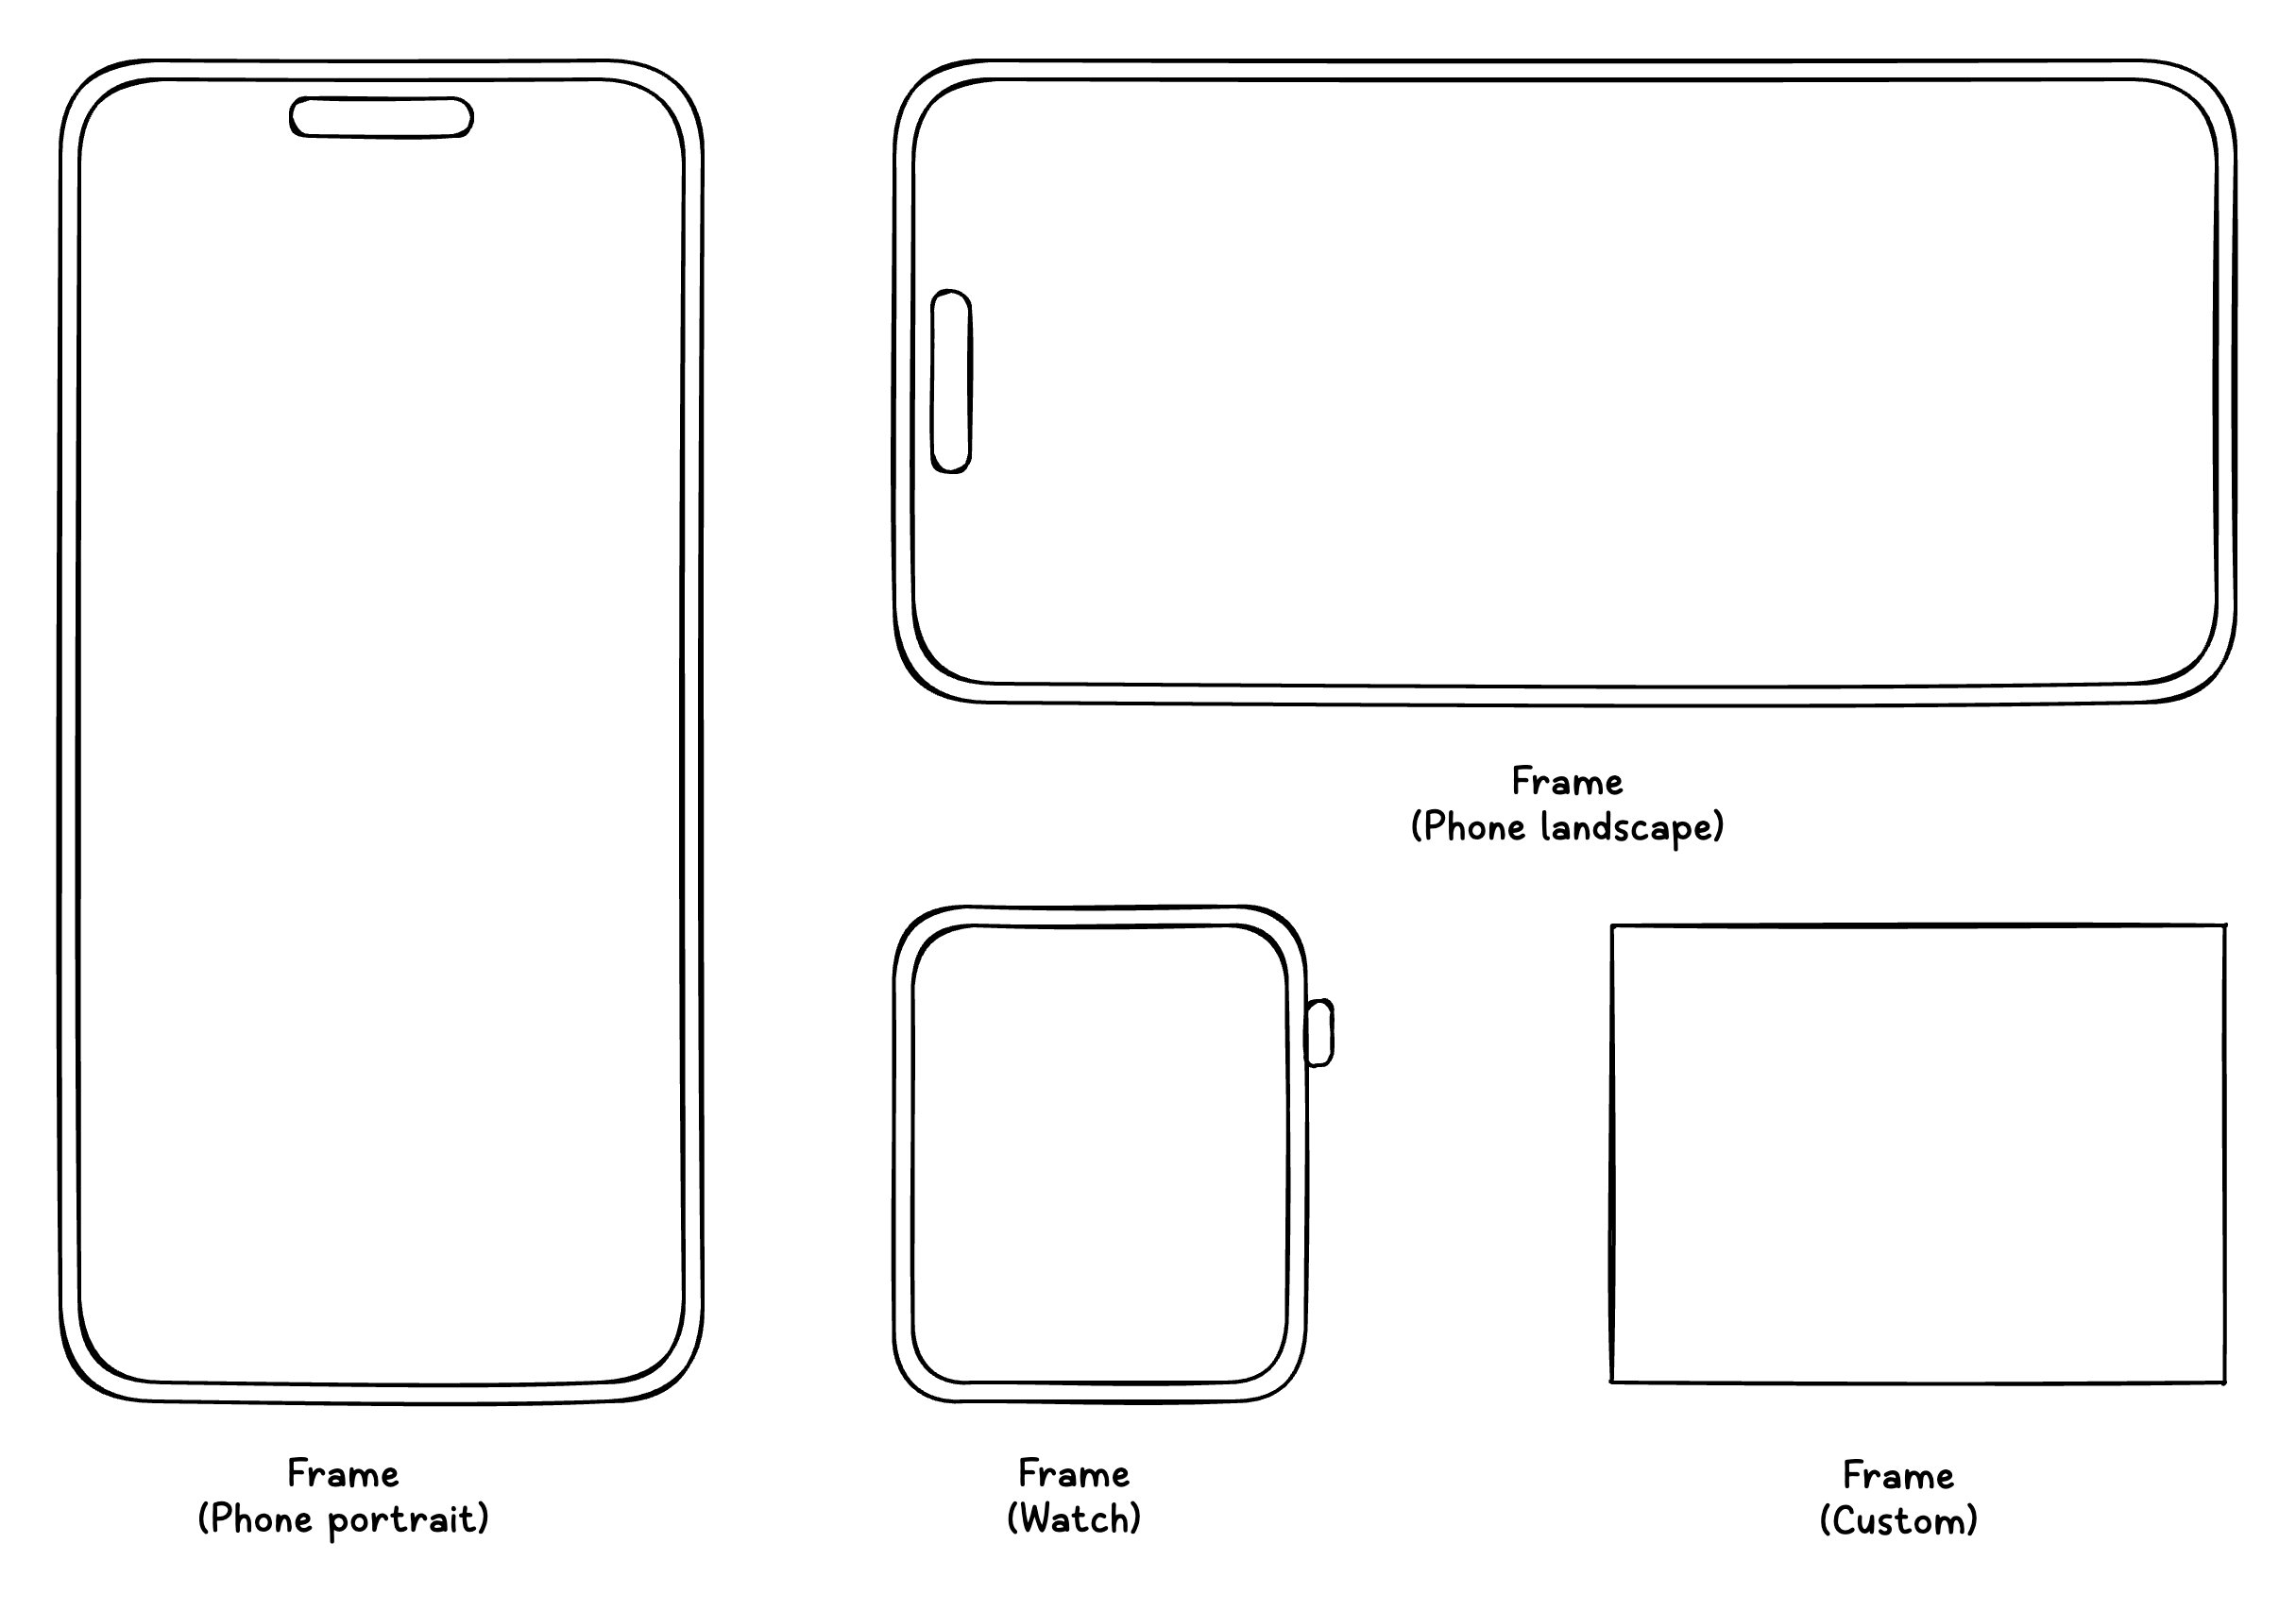
A Frame represents a single screen, such as a smartphone, web browser, or desktop window, and can contain other UI shapes within it.
To add a frame, find the frame you want to add in the Frame category in the Shape View, then click on the frame you want to add, or drag and drop it onto the canvas.
![]()
An Icon represents a small icon shape composed of lines.
To add an icon, please refer to Adding icons.
Mirror
Section titled “Mirror”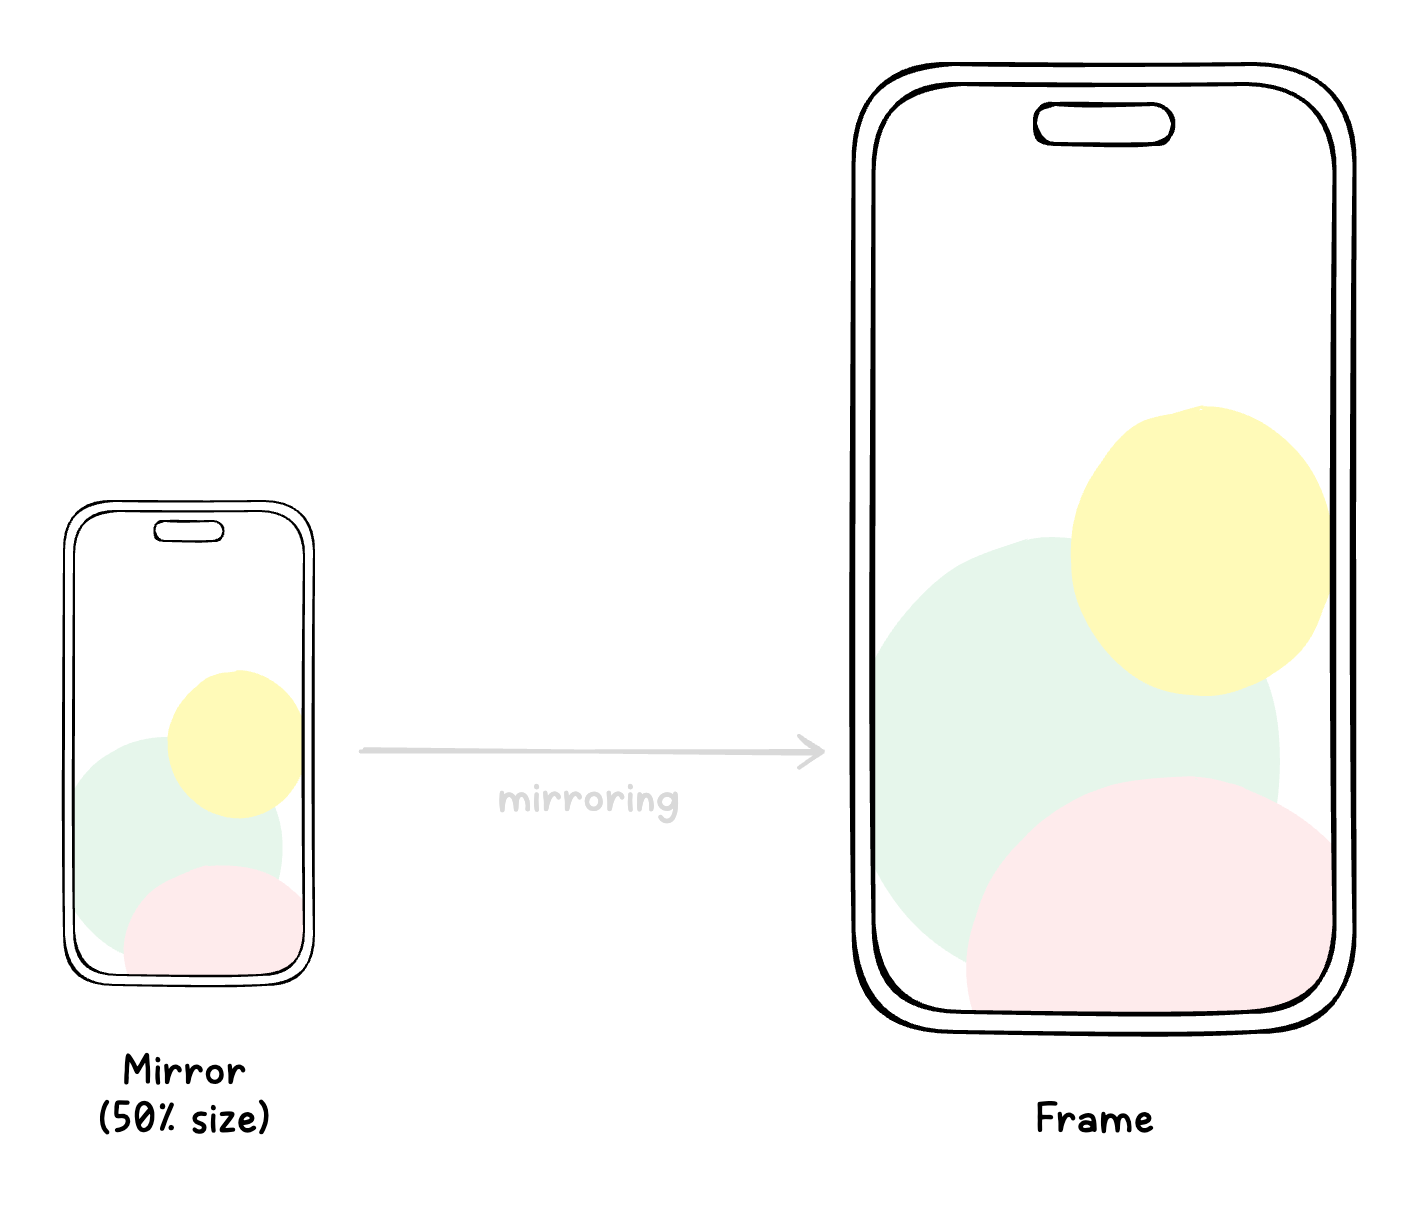
A Mirror is a shape that mirrors a specific frame shape exactly. Mirror is useful when the same frame design is repeatedly used in multiple places. Additionally, placing mirrors of frames is very helpful when creating a screen flow diagram.
To add a mirror:
- Open Layers View from the Navigator Sidebar.
- Find a frame to mirror.
- Drag and drop the frame onto the canvas.
A single document consists of one or more pages. On each page, multiple shapes can be arranged. For prototyping, it is recommended to include one screen (frame) per page. Additionally, it is advisable not to place too many shapes on a single page whenever possible. All pages can be managed in the Pages View.
To add a page:
- Press
+button in the Pages View, or select Add page from the Context Menu on the Pages View.
To delete a page:
- Select Delete page from the Context Menu on the Pages View.
To duplicate a page:
- Select Duplicate page from the Context Menu on the Pages View.
To adjust the order of page:
- Simply drag and drop the pages with the mouse from the Pages View.
Templates
Section titled “Templates”When creating a wireframe for an application, it’s common to have many screens that share the same or similar structure. Examples include screens like Sign up, Sign in, and Settings. To avoid repeating the same work for these screens every time, Frame0 support templates. A template is a wireframe of a single page that can be reused.
To reuse a template,
- Open the Template Dialog by selecting View > Templates… from the Main Menu or pressing Templates… button from the Toolbar.
- Select a device type (Web, Phone, Tablet, Desktop, Watch or TV).
- Click a template page to reuse, then template page is duplicated into your project.
Grouping
Section titled “Grouping”Two or more shapes can be grouped into a single shape.
To group shapes:
- Select two or more shapes to group.
- Press
Cmd/CtrlG, or select the Group from the Context Menu on the canvas.
To ungroup:
- Select a group to ungroup.
- Press
Cmd/CtrlShiftG, or select the Ungroup from the Context Menu on the canvas.
Locking
Section titled “Locking”You can lock a shape to prevent it from being manipulated. This is useful when you need to work with a specific shape as a background.
To lock a shape:
- Select a shape to lock
- Press
Cmd/CtrlShiftL, or check the Lock menu from the Context Menu on the canvas.
To unlock a shape:
- Select a shape to unlock. A shape in the locked state cannot be selected with a left mouse click. You can select with a right mouse click, which will also bring up the Context Menu. You can also select a locked shape in Layers View.
- Press
Cmd/CtrlShiftL, or uncheck the Lock menu from the Context Menu on the canvas.
Hiding
Section titled “Hiding”Sometimes, you may want to temporarily hide specific shapes. (For example, when exporting an image excluding certain shapes).
To hide a shape:
- Select a shape to hide
- Press
Cmd/CtrlShiftH, or check the Hide menu from the Context Menu on the canvas.
To show a hidden shape:
- Select a hidden shape to show. A shape in the hidden state cannot be selected with a left mouse click. You can select with a right mouse click, which will also bring up the Context Menu. Or, you can also select a hidden shape in Layers View.
- Press
Cmd/CtrlShiftH, or uncheck the Hide menu from the Context Menu on the canvas.
Hidden shapes are displayed with a faded effect in the Layers View, making it easier to locate invisible shapes.
Container
Section titled “Container”Shapes that can contain other shapes are called containers. For example, frame shapes are all containers. Users can set or unset specific shapes as containers.
To set shapes as containers:
- Select shapes to set as containers.
- Press
Cmd/CtrlShiftT, or check the Container menu from the Context Menu on the canvas.
To unset shapes as containers:
- Select shapes to set as containers.
- Press
Cmd/CtrlShiftT, or uncheck the Container menu from the Context Menu on the canvas.
States
Section titled “States”Some specially designed UI shapes (e.g., Switch, Combobox, …) have states. These shapes render differently depending on their state changes.
To change the states with the Floating Toolbar:
- Select a shape on the canvas.
- Click States button from the Floating Toolbar.
- Adjust the states of the shape.
To change the states with the Inspector Sidebar:
- Select shapes on the canvas.
- Adjust the states in the State tool on the Inspector Sidebar.
A Table is a specially created shape composed of multiple combined shapes. A Table shape contains multiple Row shapes, and each Row contains multiple Cell shapes. Each Table, Row, and Cell can be individually selected and manipulated. To add or delete rows and columns in a table, you must use the Table tool in the Floating Toolbar.
To add a table:
- Find Table shape in the Shapes View. (Search by “table” keywords or find in the Components category)
- Click the table shape, or drag and drop on the canvas.
Align columns
Section titled “Align columns”Each cell can be resized independently. If you want to align all cells to match the columns in the first row:
- Select a table.
- Select Align columns of the Table tool from the Floating Toolbar.
Manage rows
Section titled “Manage rows”To select a row:
- Select a row shape directly with pointing device. (Cells within a row are automatically aligned to the left, so selecting the empty space on the right makes it easier to select the row)
- Select a cell (in the row to select) and then select Select row of the Table tool from the Floating Toolbar.
To insert a row:
- Select a table (or a row or cell).
- Select Insert row above or Insert row below of the Table tool from the Floating Toolbar.
To delete a row:
- Select the row (or the cell) to delete in a table.
- Select Delete row of the Table tool from the Floating Toolbar.
To duplicate a row:
- Select the row (or the cell) to duplicate in a table.
- Select Duplicate row of the Table tool from the Floating Toolbar.
To move up or down a row:
- Select the row (or the cell) to move in a table.
- Select Move row up or Move row down of the Table tool from the Floating Toolbar.
Manage columns
Section titled “Manage columns”To select a column:
- Select a cell (in the column to select) and then select Select column of the Table tool from the Floating Toolbar.
To insert a column:
- Select a table (or a cell).
- Select Insert column left or Insert column right of the Table tool from the Floating Toolbar.
To delete a column:
- Select a cell (in the column to delete) in a table.
- Select Delete column of the Table tool from the Floating Toolbar.
To duplicate a column:
- Select a cell (in the column to duplicate) in a table.
- Select Duplicate column of the Table tool from the Floating Toolbar.
To move left or right a column:
- Select a cell (in the column to move) in a table.
- Select Move column left or Move column right of the Table tool from the Floating Toolbar.
Layers
Section titled “Layers”A single document contains multiple pages, each page contains multiple shapes, and shapes can also contain other shapes. This hierarchy can be viewed in the Layers View.
Aligning shapes
Section titled “Aligning shapes”You can adjust the z-order of shapes or align them in a specific direction.
Z-ordering
Section titled “Z-ordering”To bring the selected shapes to front:
- Press
Cmd/Ctrl[. - Click Bring to front button in the Alignment tool from the Floating Toolbar.
- Click Bring to front button in the Alignment tool from the Inspector Sidebar.
- Select Bring to front in the Context Menu on the canvas.
To bring the selected shapes one-step forward:
- Press
[. - Click Bring forward button in the Alignment tool from the Floating Toolbar.
- Click Bring forward button in the Alignment tool from the Inspector Sidebar.
To send the selected shapes to back:
- Press
Cmd/Ctrl]. - Click Send to back button in the Alignment tool from the Floating Toolbar.
- Click Send to back button in the Alignment tool from the Inspector Sidebar.
- Select Send to back in the Context Menu on the canvas.
To send the selected shapes one-step backward:
- Press
]. - Click Send backward button in the Alignment tool from the Floating Toolbar.
- Click Send backward button in the Alignment tool from the Inspector Sidebar.
Aligning multiple shapes
Section titled “Aligning multiple shapes”To align the selected shapes to the left:
- Press
Alt/OptionA. - Click Align left button in the Alignment tool from the Floating Toolbar.
- Click Align left button in the Alignment tool from the Inspector Sidebar.
To align the selected shapes to the (horizontal) center:
- Press
Alt/OptionH. - Click Align center button in the Alignment tool from the Floating Toolbar.
- Click Align center button in the Alignment tool from the Inspector Sidebar.
To align the selected shapes to the right:
- Press
Alt/OptionD. - Click Align right button in the Alignment tool from the Floating Toolbar.
- Click Align right button in the Alignment tool from the Inspector Sidebar.
To align the selected shapes to the top:
- Press
Alt/OptionW. - Click Align top button in the Alignment tool from the Floating Toolbar.
- Click Align top button in the Alignment tool from the Inspector Sidebar.
To align the selected shapes to the (vertical) middle:
- Press
Alt/OptionV. - Click Align middle button in the Alignment tool from the Floating Toolbar.
- Click Align middle button in the Alignment tool from the Inspector Sidebar.
To align the selected shapes to the bottom:
- Press
Alt/OptionS. - Click Align bottom button in the Alignment tool from the Floating Toolbar.
- Click Align bottom button in the Alignment tool from the Inspector Sidebar.
To distribute the horizontal spacing of the selected shapes evenly:
- Press
Alt/OptionShiftH. - Click Distribute horizontally button in the Alignment tool from the Floating Toolbar.
- Click Distribute horizontally button in the Alignment tool from the Inspector Sidebar.
To distribute the vertical spacing of the selected shapes evenly:
- Press
Alt/OptionShiftV. - Click Distribute vertically button in the Alignment tool from the Floating Toolbar.
- Click Distribute vertically button in the Alignment tool from the Inspector Sidebar.
Exporting images
Section titled “Exporting images”To export the selected shapes (all shapes if nothing selected) in the current page as an image, press Cmd/Ctrl E, or select File > Export image from the Main Menu. You can adjust the options of the image to be exported.
- Dark - Exports the image in dark mode if checked.
- Background - Fills the background if checked. (uncheck for a transparent background).
- Scale - Select the image scale (1x, 2x or 3x).
- Format - Choose the image format (PNG or SVG).
- Margin - Select the size of the margin to include in the image.
- Export - Save the image as a file.
- Copy to clipboard - Copy the image to the clipboard.
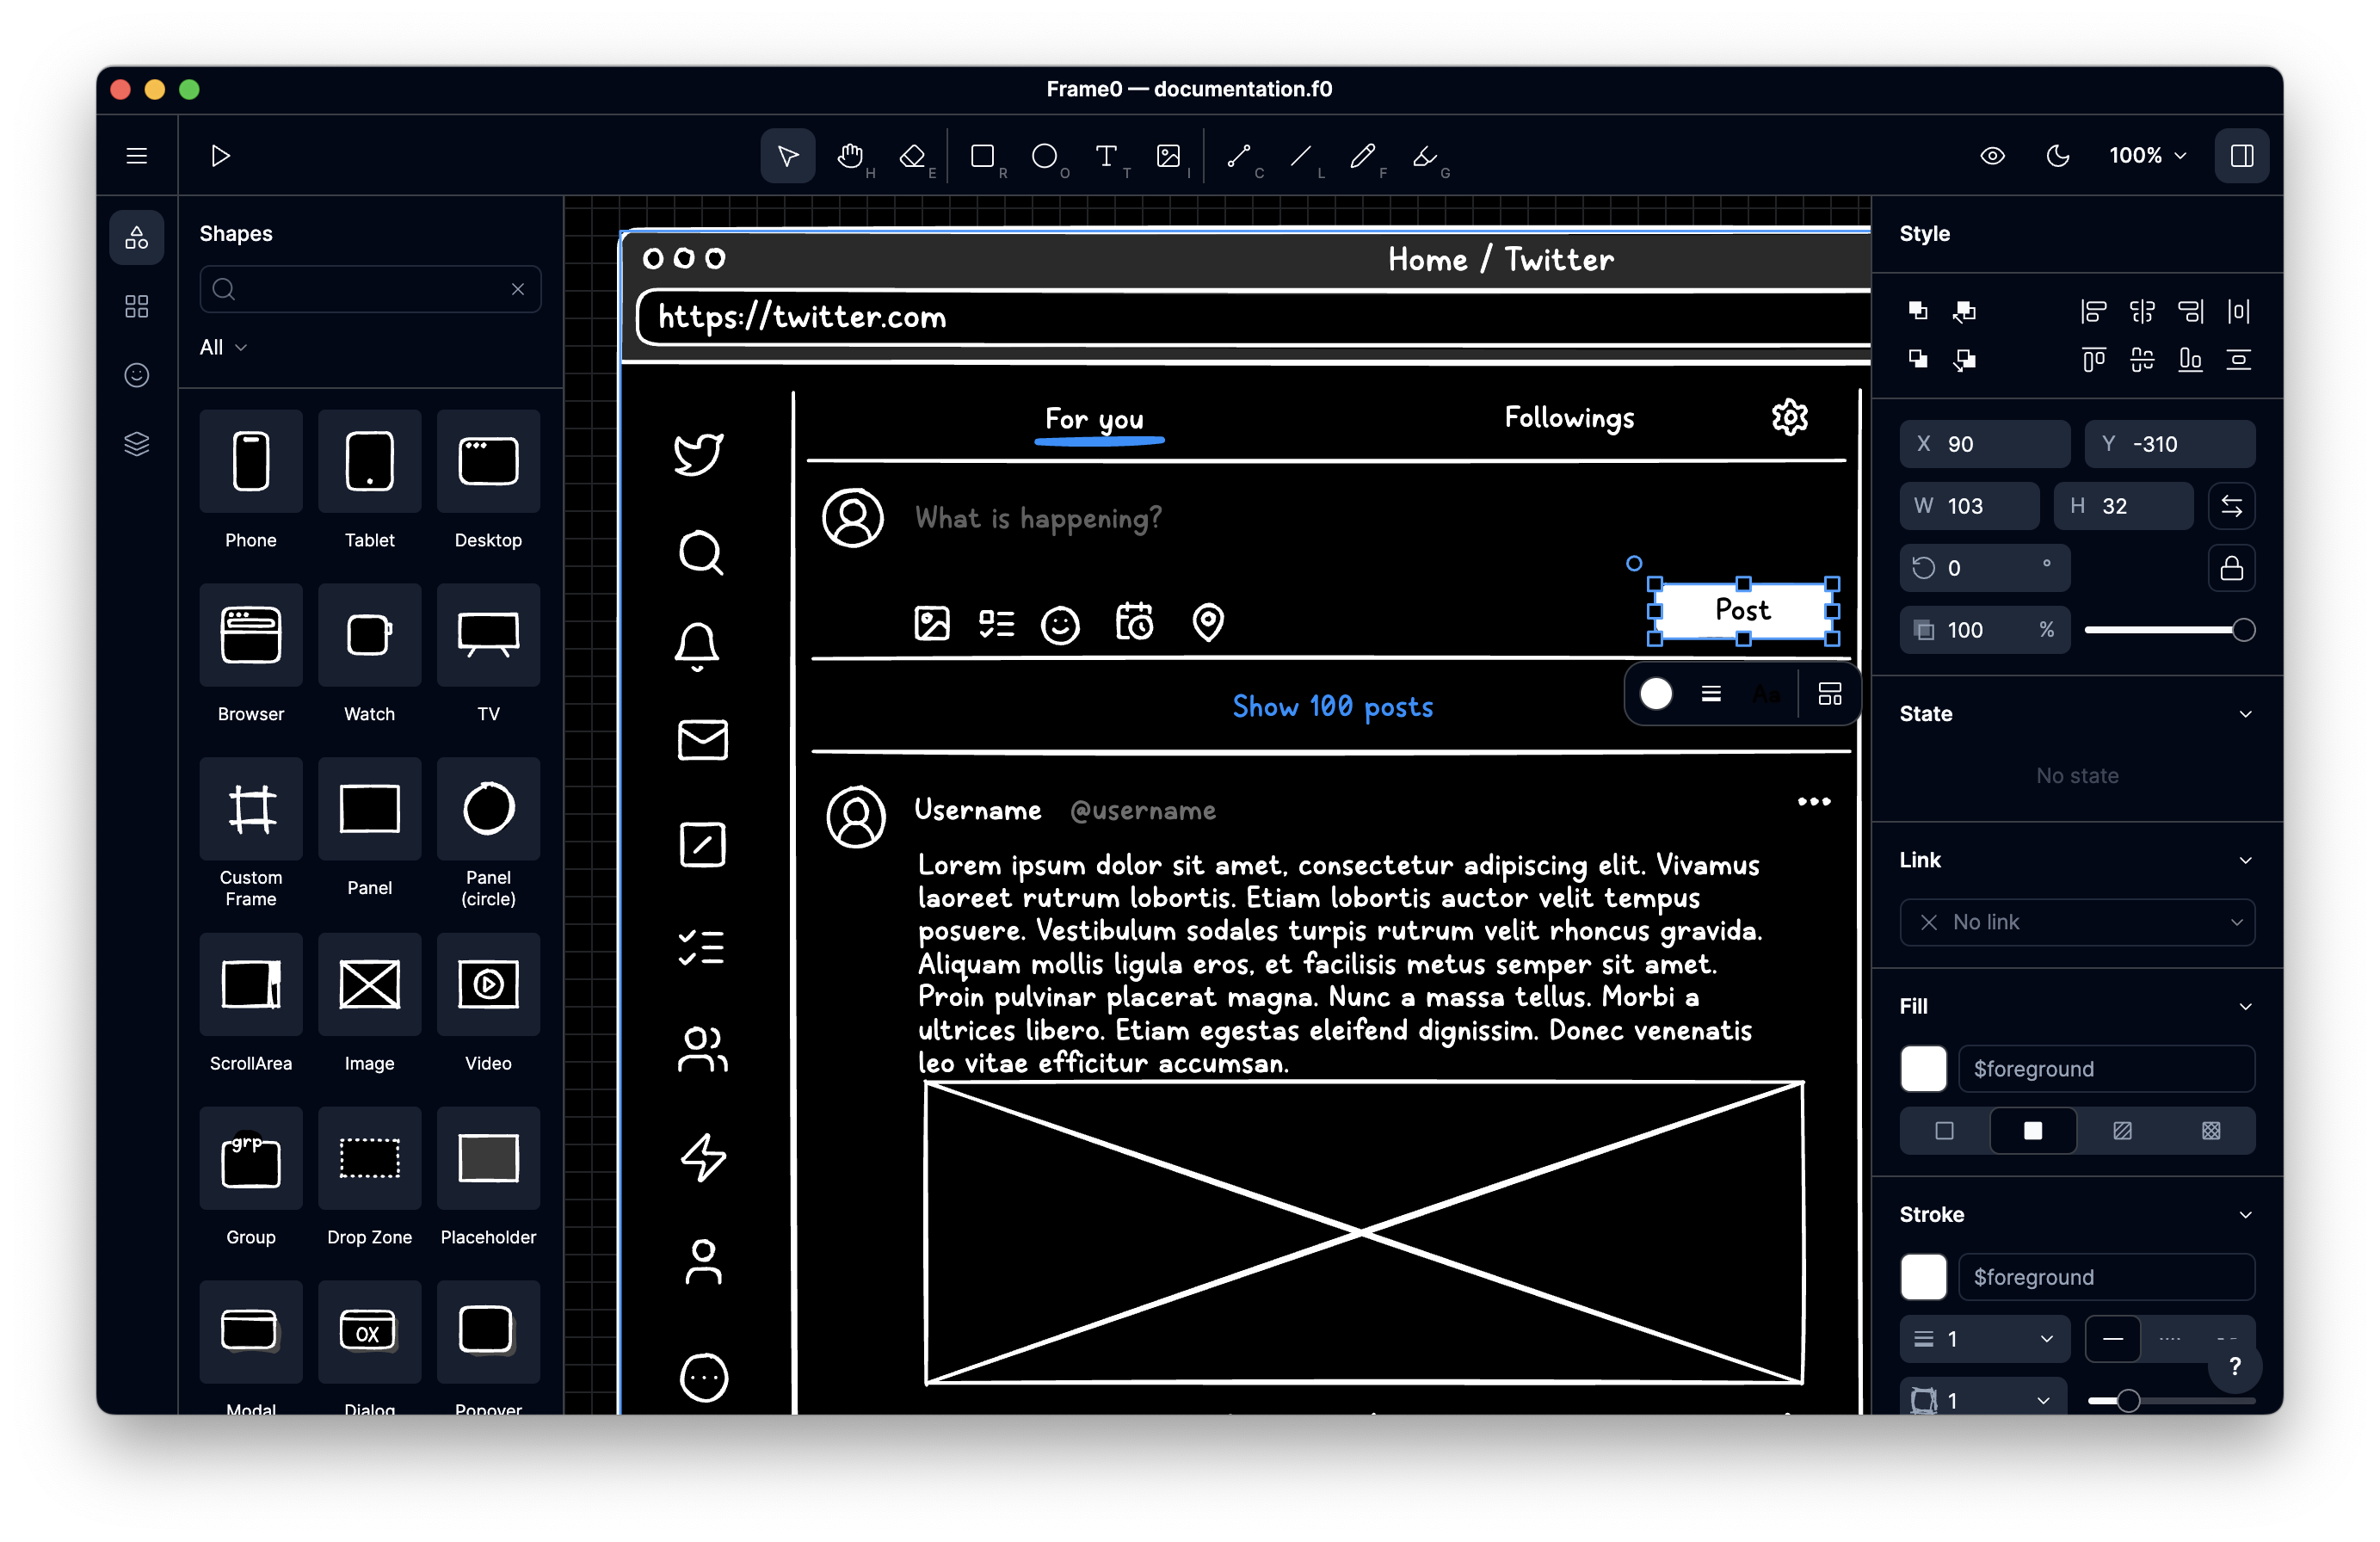
Dark mode
Section titled “Dark mode”Dark mode allows that the background is dark and the shape is displayed in light colors.
To toggle dark mode:
- Press
Cmd/CtrlShiftD. - Select Dark mode button from the Toolbar.
- Select View > Dark mode from the Main Menu.
Zooming
Section titled “Zooming”To zoom in the canvas, press Cmd/Ctrl +, or select Zoom in in the Zoom options dropdown menu from the Toolbar, or select View > Zoom in from the Main Menu.
To zoom out the canvas, press Cmd/Ctrl -, or select Zoom out in the Zoom options dropdown menu from the Toolbar, or select View > Zoom out from the Main Menu.
To zoom to 100% the canvas, press Cmd/Ctrl 0, or select Zoom to 100% in the Zoom options dropdown menu from the Toolbar, or select View > Zoom to 100% from the Main Menu.
To fit the canvas to the screen, press Cmd/Ctrl 9, or select Fit to screen in the Zoom options dropdown menu from the Toolbar, or select View > Fit to screen from the Main Menu.
